CGI and visual effects are expensive. Especially when done right. The amount of VFX artists and the amount of hours they put into work sometimes reaches thousands when it comes to big budget films.
The process of VFX creation takes a long time by default, but if you add low-quality footage on top of that, visual effects just become an excruciating pain for artists. That is why it is important to consider computer generated items long before they are actually added to frames. And lens distortion grid is just another step filmmaking crews must take on the preproduction stage.
Why care about lens distortion at all
Take, for example, anamorphic lenses. Since the last century they have been popular among filmmakers, creating that cinematic effect with a wide view that seems to capture all surroundings of the set. Anamorphic lenses achieve this effect by squeezing the image horizontally, so that more objects can get into the frame.
The thing is, each lens, especially anamorphic, has its own distortion characteristic and breathing. Meanwhile, it is a common practice to use a few lenses on set to create different emotions and atmosphere across the whole piece. It might not be obvious to an average viewer, but the images shot with different lenses will bend and warp, squeeze, and shrink, causing huge problems for VFX artists for integration of CG items.
To add something that was never in the shot, visual effects teams have to track movements of objects within that particular shot. When the motion data is collected, artists can apply it to elements composited into the scene. Because of lens distortion, pixels on edges of frames move differently from those in the center, making the whole process of tracking extremely difficult. As a result, composited elements slide with each camera movement, destroying the initial vision of cinematographers.
This was a brief explanation, why distortion is so important to the whole VFX process.
What is a lens distortion grid?
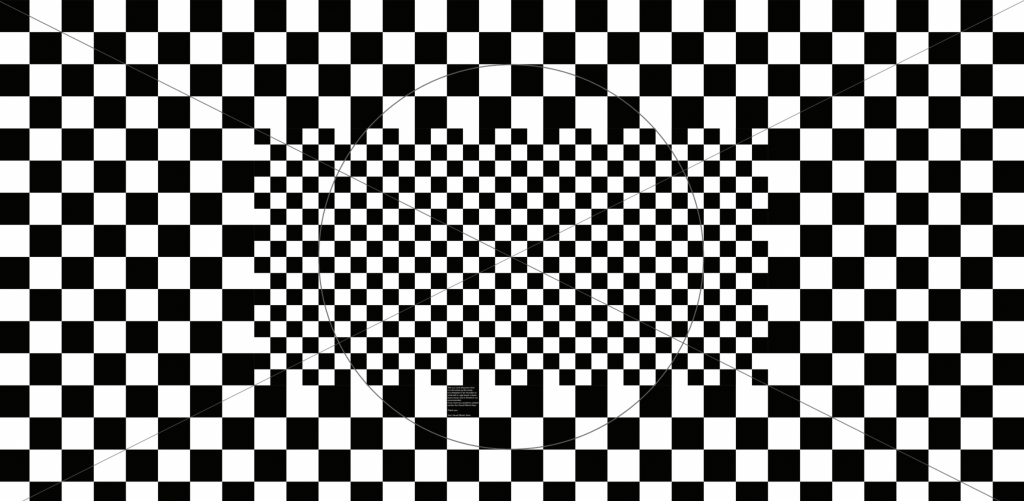
Lens distortion grid is a simple tool that helps VFX professionals to unwarp the image and to better stabilize motion within shots for a further VFX integration. It’s basically a checkered board with a clear central point and strictly straight lines.
It comes in different sizes and varies in composition of checkers (which you’ll see below), but one main principle remains: the distortion grid must be big enough to cover the whole frame during the shooting.
Here’re a few examples of lens grids that we took from Eric Alba’s website for reference, so you can understand how a grid looks like.
Base lens distortion grid
Base lens distortion grid with smaller nested grids
Base lens distortion grid with smaller nested grids and an XO
The XO here is very useful to align the camera viewfinder with the XO on the grid, to make sure that you don’t cause even more distortion with unnecessary inclinations. We’ll talk about that more later.
How to make a distortion grid
First, try to rent one instead. There’s a big chance that shops with filmmaking equipment for rent also have a few ready-to-use distortion grids.
If none is available to rent, you or your Art department can have the grid printed in any print shop that does large-format printing. At the end of the article, we include a link for you to download Eric Alba's grids in PDF and send them to any printing center nearby.
The size of the grid is usually 8’x4’, so it’s big enough to cover the entire frame. Once printed, make sure to mount it on a sturdy material that will not bend in any way. A PVC, plywood board or a foam core board with some crossed braces on the back will do a great job. It is crucial that the grid cannot bend during transportation or under its own weight – it’s better not to have a distortion grid at all rather than working with a warped one.
Please make sure that there are no bubbles and creases when you mount the paper banner on a rigid board. We would also recommend covering the grid with a matte finish, to avoid flares and ensure a sharp image instead.
How to line up a lens grid
Lining up a lens grid is a two-men job. The board with the grid must be set up on C-stands, light stands, or any equipment with adjustable height, so it’s plumb and faces the camera flat. To prevent tilting of the board, use an inclinometer or a spirit level to align the grid strictly horizontally.
At the same time, the camera must be as perpendicular to the grid as possible. If you have multiple positions to shoot the grid from, it is better that you place the camera on a dolly track to facilitate a fast movement through positions. To be certain that the camera is not leaning anywhere, you can use a spirit level for it just as you did for the lens grid. Or, if your board has an XO element on it, just line up the camera viewfinder with the XO.
Last but not least, light up the grid nicely, so it doesn’t have shadows or flare. Make sure that the grid looks sharp and focused within the frame, and you’re ready for the next step!
How to shoot a lens grid
Different types of lenses warp and distort the image in their own unique way. No kidding, even lenses of the same model of the same manufacturer affect the image inconsistently – to the extent that VFX teams have to slate serial numbers of lenses to take notes for future reference. Here’s a brief instruction on how to shoot a lens distortion grid and save your time in post.
Talk to 1st AD to make some time available for you to shoot the grid in preproduction or at camera checkout. Ask Assistant DP to provide you with the information about lenses to be used on set and inform the crew what extra resources you’ll need to make the process go faster.
Shoot the grid entirely filling the frame at the T-stops that will be used during the production. Use a dolly to move through positions that will be used during the production, too. It is important that you use the same lens, the same environment, the same focal length that is intended for the actual shooting of the film. Otherwise, the whole process is completely unnecessary and simply wastes everybody’s time.
Another extra-important step: slate every take with any parameter change, even if you change the body of a camera. Here’s what should be documented on a slate at all times:
Lens type and serial number
Camera body
Focal length
T-stop
F-stop
Focus distance
Distance from the grid to the camera
Reslate for each position, exposure, and focus change.
Conclusion
Preparations during preproduction can effectively save time for the postproduction processes. The better quality of an image a VFX team gets, the faster the project is finished and the better quality of computer graphics you get. Lens distortion is one of the factors that causes headaches among VFX artists, wasting their effort and postponing the final serve of the project. Distortion warps, bends, shrinks, and unshrinks the image, making CG objects slip and slide, killing the final effect.
But all struggles can be avoided, if we do our preparations. In this case, we must make some time available to shoot lens grids during pre-pro or at camera checkout. Lens distortion grids plot and map the image in post and help to quickly integrate visual effects with your original footage without any slips of CG objects.
Click here to download PDF with distortion grids from Eric Alba.


_1024x0_d94.jpg)
%20(1315%20x%20580%20пикс.)_1024x0_a3c.png)